Showing posts with label Tips And Tricks. Show all posts

17 October 2017

// // 5 comments

How To Find Direct Download Link Of Any Movie

Find Direct Download Link Of Any Movie

If you are a movies lover like me then you too might be usually kept on searching for direct download links of your favorite movies. Today almost everyone loves to watch latest movies and sometimes when we don’t have time to rush to the cinema hall and we download movies and watch it via our smart device. However, the tough thing that we generally have to face is the direct download link, you just go on clicking shitty links and ads and never get the thing that you want. So here I have a cool way using which you can find a downloading link of any movie that you want to download to your smartphone. So have a look on complete guide discussed below to proceed.

So for this, I have a google search trick that will help you in Finding Direct Download Link Of Any Movie. The trick is very cool and handy and needs just a single code line given below. So proceed with this below.


How to Find Direct Download Link Of Any Movie

The method is quite simple and you just need a cool Google trick to get the downloading link of any movie by just getting the exact URL of the movie stored on server by giving perfect query to the Google robots and with that you can find the direct download link of any of your favorite movie.


Method 1:

Steps to Find Direct Download Link Of Any Movie:

Step 1. First of all launch out the web browser on your device.


Find Direct Download Link Of Any Movie

Step 2. Now type the name of a movie that you want to download and after name, copy and paste the below code along with the movie name.


Movie Name -inurl:(htm|html|php|pls|txt) intitle:index.of “last modified” (mp4|wma|aac|avi)

Find Direct Download Link Of Any Movie

For e.g. :- Now You See Me -inurl:(htm|html|php|pls|txt) intitle:index.of “last modified” (mp4|wma|aac|avi)

Step 3. Now you will get the Google result and you can browse out either first or second result and you will get the direct download link of the movie.


That’s it! You are done. with this, now you will get the direct download link of any movie and download it with your favorite download manager.


Method 2:

Steps to Find Direct Download Link Of Any Movie:

Step 1. First of all in Google, copy the below code:

intitle:index.of? mkv


Find Direct Download Link Of Any Movie

Step 2. Now open google.com in your browser and paste the above code there and after this code, you have to enter the name of the movie that you want to download.
For example, if you want to download the movie Avengers then simply enter the code:


Find Direct Download Link Of Any Movie

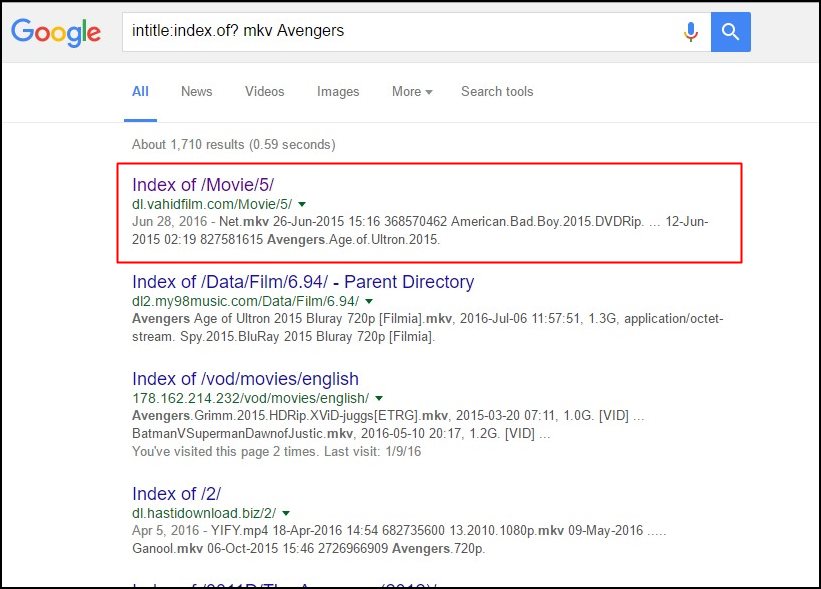
intitle:index.of? mkv Avengers

Step 3. Hit enter there and you will now see lots of search results there and they may or may not be containing the actual name of your movie. Press CTRL+F and search for your movie. Simply click on the movie link.


Find Direct Download Link Of Any Movie

Now when you open in then you will see the PHP page containing the file of the movie that you are going to download.

Simply click on it, that’s it you are done, now your downloader will detect that and you are done, a movie will start downloading in your device. You can also search for any of your favorite formats to download the movie by replacing Mkv with your desired format.


So above is the way for Finding Direct Download Link Of Any Movie. Best and easy way to get your favorite movie over the internet without searching out in lots of sites and wasting your precious time. Also, this method will work for music too by replacing mp4 with mp3 in the line above. Hope you like this cool Google search trick, don’t forget to share it with other too. Leave a comment below if you have any related queries.

Read More

12 July 2016

// // Leave a Comment

How To Turn On Game Bar To Record & Take Screenshots In Windows 10

Windows Game Bar

Game bar is the part of Game DVR feature offered by the Xbox app exclusive to Windows 10. The Game bar includes icons for quickly opening the Xbox app, controlling background recording, taking a screenshot, recording a gameplay video, and accessing settings.

Turn Game Bar On or Off in Windows 10

1.) Click on Start Menu and Open the "Xbox" app.

2.) Click Settings icon on the left and goto "Game DVR".

3.) Under Record Game clips & sreenshots using Game DVR, turn the toggle to right to turn ON the Game bar.

Record and Take Screenshot Using Game Bar in Windows 10

Even though Game bar is a feature of Xbox app, you can use Game bar to record and take screenshots of any app in Windows 10.

1.) Open the app/game you want to record, press "Windows G" keys combination to open Game bar.

2.) Check the "Yes, this is a game" prompt, if it appears. To record the video, click the "Red Dot" record button.

---> Press the button again to stop the recording.

---> Alternatively, press "Windows Alt G" to start or stop recording.

---> To take screenshots, you can press "Windows Alt PrintScrn" keys or click the Screenshot (camera icon) button.

NOTE:Game bar in Windows 10 saves videos .mp4 format, and screenshots in .png format.

Hope you liked reading this article.BUT don't forget to comment.Till then happy gaming....

Read More
// // Leave a Comment

How To Accept All FB Friend Request With A Single Click

Hello!! Its been long since i posted something for you so by filling that gap, Today i am here with a cool trick to accept all friend requests on fb in just one click.

Let's Get Into The Tutorial....

I have found a friend request acceptor script that we can use for our task (which is in this case accepting all requests.)

JUST FOLLOW SIMPLE STEP'S BELOW

1.) Login to your facebook account and click the Friend requests icon to see the pending friend requests.

2.) Now, keep scrolling the list untill you reach the last request.

3.) Now Press F12 or ctrl+shift+J keys(in chrome browser ) to open chrome console.

4.) Now copy the following code and paste in chrome console and press Enter.

javascript:for(i = 1;i<@@@@document.getElementsByName(@@@"@@@actions [accept]@" .length;i++) {document.getElementsByName("@actions [accept]@" .click();}void(0);

Remove all ' @ ' from above code.

5.) Now your pending friend requests will be accepted automatically.

Thank for reading this article.But don't forget to comment.Till then happy accepting.....

Read More

28 June 2016

// // 1 comment

[Modding] Best And Easiest Method To Crack Rendered Ideas Games

Hello Friends! Today I Am Going to tell you an easy and most suitable method to hack and crack rendered ideas games.

Rendered Ideas are the current best game vendor for Java. Unfortunately all of their games are come with ads. Now days they using their 4th ads engine wich cant be cracked easily. If we crack it manually, then the game show Incorrect version detected download latest version again. whatever it is, there are a few special people who can carck this new ads engine. I (Jalaj) a special technique to crack their game. Compared to other expert crackers, my method is too easily.....

Steps

1- Make any rendered game zip format and extract all items to a empty folder using blueftp.

2- Clear the http link in vsevmanger.class using language editor.

3- there will be a class related to vservmanager in main root, clear the http links also in it.

4- now check all class in main root, there will be class contain google analysis link, clear it.

5- Now open bytecode editor and go to the folder named rendered ideas, search the year of the game wich announced, if game released in 2016, then search for 2016 in each class, open the the method if appear in any class and check each string, there will be string contain '2016'. Just replace 2016 with 2099 and save.

6- Now compress all file to jar format using blueftp and install. You will get the game as cracked. You can play the game till 2099 without showing the error message 'Incorrect version detected download latest version again'.Congrats!!!!!!!!

Hope you that you alive in 2099 :mrgreen:

I wrote this post in a hurry.If something is unclear, ask it in comments.Till then happy cracking.

Read More

11 May 2016

// // 2 comments

How To Upload And View Text (.txt) File In Mywapblog

Mywapblog Upload Text File

Hello ! Being a mywapblog user you should know that mywapblog doesn't allow us to upload text files (.txt) .But sometimes if we want to share some sort of tutorial or code which we can't add in post,the next option comes in our mind is adding that tutorial or code in a text (.txt) file and share it,but all hopes are dashed when we remember that we can't upload .txt file in mywapblog.

Today i am going to share a trick with you using which you can upload .txt file in mywapblog.

So Let's Start The Tutorial:

Tools Needed

#. Blueftp

Okay let me make it clear that its true that we can't upload .txt file but yes we can fool mywapblog and have our work done in some simple steps given below:

1.) I suppose that you have your .txt file.

2.) Now let's assume that your file name is XYZ.txt (it is just for example purpose your file can have any name ending with a .txt extension)

3.) Now download BlueFtp from above and open it, after opening blueftp locate the folder or location where your text file is present.

3.) Select the text file,open menu and select rename.

4.) Rename

XYZ.txt

To

XYZ.css

.

5.) Click Ok and save your file (which should now be renamed like XYZ.css)

6.) Now go to Your mywapblog dashboard < add < file .

7.) Locate and upload your file (XYZ.css)

8.) Now open the file and Congrats!! it will not show the download window instead of that it will show the text/code present inside your file.

Last Words

I hope you liked the article and now you are able to view your text files online without any problem.But if you have any problem then please don't hesitate to ask it via comments.Till then happy blogging!!!!!

Like Our Fb Page to get latest updates and more posts like this.

Read More

12 April 2016

// // Leave a Comment

HOW TO SPPED UP YOUR MOBILE INTERNET

STEPS TO SPPED UP NET

1. The First Point Is Obvious Find Some Near Hotspot And Use Their Internet As Its Fast And More Active. As They Are Connected To A Broadband Which They Are Simply Distributing Through Wi-Fi So You Can Take Advantage Of That Thing And Enjoy Faster Speeds.

2. All The Bonds, Using Mobile Internet Or EDGE In A Congested Room Entirely Covered With Walls And Think Plates Can Cause Decrease In Mobile Internet Service So Better To Use It In Open Without Any Walls Or Anything.

3. Using Mobile Internet In Off Peak Hours Can Seriously Boost Up The Speed Because The Using Traffic Is Really Low The Times Which Is Suitable For This Thing Is @ Night, So Try To Use It In Night As It Can Really Help You Out.

4. Updating Your Mobile Firmware Can Get New Settings Or Mods For Your Phone Which Can Rapidly Increase Speed And Gain More Connectivity So Every Month Always Check That If There Are Any Updates For Your Phone.

5. Well The Last Thing Can Cost You Some BUCKS But May Show You Some Increase In Your Speed Is That Purchase Booster I.E. Antenna Which Can Rapidly Capture More Signals And Gain More Connectivity So You Can Try This One.....

Keep Visiting - http://minetechworld.heck.in

Read More

11 April 2016

// // Leave a Comment

How to minimize use of your data speed up your net

Internet connections in rural India is really painful. Like me, I'm out of town, I use limited 2G and 3G prepaid data pakes.

In mobile phones these connections are OK, but in case of PC, web browsing in PC will ruin your day.

yc067.gifOut of Time or Out of Data .yc038.gif

After a long work I got some tips, and I would like to share them.

Well There will be three steps.

Step 1: Blocking Unwanted, hidden Apps and services.

You can check which apps are using internet by opening Resource Monitor(Task Manager> Performance Tab> Open Resource Monitor> Network Tab). 164821rdh3cxq9x5lrqj9d.png 1.) Blocking Windows Update Service:

In most of cases windows update service[svchost.exe(netsvcs) used by BITS - Background Intelligent Transfer Service] eats all the bandwidth and data usage.

To stop Windows Update in background follow these steps:

1. Go to Control Panel > System and Security > Windows Update > Change Settings.

In drop down menu chose "Check for updates but let me choose whether to download and install them" and uncheck "Recommended Updates". Save and exit. 164941gsdjuuc0c7np0d03.png 2.) Open Services by RUN (Windows R) > Type "services.msc". 165332g72h43tgsqsm2xee.png Scroll down and select Windows Update.

Right click > Properties > Choose Startup type "Disabled" > Apply > OK 165056dmojgl2twwwzk0ff.png Then select Background Intelligent Transfer Service.

Right click > Properties If the service is running then first STOP it by clicking Stop. Choose Startup type "Disabled" > Apply > OK. 165157yq8bz8qjdcyowvbw.png 3. Open System Configuration by RUN > type "msconfig". In services tab uncheck BITS. Apply > OK. 165244m2pt8o9wodmcjomw.png

Blocking unwanted apps:

You can block any particular app from connecting to internet using Windows Firewall. But it is a long process and if you have to block a lot of apps then it will crack your eyes and brain. So all you have to do is download a app called "Glasswire". Its a free and paid app. But the free version is enough for you. It has a lot of eyes, it will record all your network activity. It has network graph, firewall, usage record, themes and lot more.Well, download and install Glasswire. Open firewall and turn it ON.It will list all new apps whenever they connects to internet and gives a notification to you. 165434w4ijcuusw5xsgjc5.png Block any unwanted apps by clicking the left side fire sign. (Check screen shot)

Step 2: Download and install Opera Web Browser latest version.

It is a chromium based browser with all the functions of chrome and more than that. It has a option Called "Opera Turbo", which will compress webpages and images using opera server (global-tu rbo2-lvs-hopper.opera-mini.net) same as Opera Mini in mobile phones. It does not use too much data in background, as Chrome and firefox do. 165518ex13im31ol779111.png

Step 3: Download ad-blockers ans tracking killers.

Ads and trackers use half of the data in webpages. Time to kill them.Download Adblock Plus and Ghostery. 165556z070k8y84c94k2c9.png165613hatt09h0h5h9531a.png

Some more tips:

1. Install a network monitor to check network activity all time.

Whenever u found some unwanted activity end them using task manager or block them by firewall.

You can check IOBit Performance monitor or install Rainmeter and use some network monitor skin.

165721q89gb48v0clvzs08.png

2. Block unwanted ips or hosts using firewall.

Search Google and make things easy. Good Luck.

Thanks for reading.

Keep Visiting - http://minetechworld.heck.in

Read More

07 April 2016

// // 5 comments

How To Stop Copying Of Your Blogs Css (Special Post)

Hello Friends Today i am here with a special trick for you.....

You work very hard to make your blog look like the way you want....and people takes some seconds and cram it to their site without thinking how much hard work it needs......

its-mine-only.png

And that is one of the reason i thought of sharing this trick with you all....

So by not wasting your more time let's get into the tutorial....

Tutorial Starts Here....

1.) At First Go To Your Dasboard < Themes< Edit Css .

2.) Then Copy All Your Css.

3.) After that go to notepad or any text editor and paste all the text there which you copied in step 2.

4.) Now save your file with a " .css " extension.

For example: Minetechworld.css

If you don't have any text editor in your phone then don't worry you can do it online also at http://editpad.org (Comment Below If You Need Any Help)

5.) Now after you have successfully saved you css file in your phone now its time to upload it.So go to your Dashboard < Files.

6.) Upload your .css file to your blog. (in my case its Minetechworld.css)

Kindly Remember Or NoteDown the name Of File You Uploaded.

7.) Now Go Again To Dashboard< Themes< Edit Css and paste the below code there....

NOTE : REPLACE MINETECHWORLD.CSS WITH THE NAME OF YOUR UPLOADED FILE.

Trick starts From Here

After working on all the above procedure now its time to do some more work :P

As long as i know after doing all the work your blog css will look like this..

@import url(/files/something.css);

Now if you want your css not to be copied then you have to put some errors in your css for decieving copycats such as...

@import url(/files/anything.css);

@import url(/files/manything.css);

Do more than 100 errors in your css like those in above and then put your real one in between of them and save it.

That's it.Congratulations You Have Sucessfully Protected Your Css For Copiers....

Comment Below and Keep Visiting http://minetechworld.heck.in

Read More

31 March 2016

// // 4 comments

[Trick] How to Install Apps with Expired Certificate on Nokia Devices

Friends Are You Encountering installation errors such as “Unsigned Application” or “Expired Certificate” isn’t something new for Nokia Users. While the Unsigned Application error can be patched by using third-party private keys with singing applications, there’s a relatively easier path to tackle Expired Certificate error.

All certificates have limited time period until which they are valid. After they expire, it’s just like the application has no certificate at all. So now when you know how things go around, we can use our human logic to solve the situation.

It’s simple: we’re just going to “shift back” in time, to time during which the certificate was valid and hence install it.

1.Go to your Time and Date Settings.

Screenshot0045-300x225.jpg

2.Look for the Date Option.

Screenshot0046-300x225.jpg

3.We’re going to apply the Trial-and-Error method. What you have to do is reduce the time period by an year, try to install the app again. If it doesn’t work, reduce one more year and repeat the same until you are able to install it. As in my case, I know the application that I’m trying to install dates back to 2015, hence I will try an year that’s closer to it.

Screenshot0047-300x225.jpg

If this method doesn’t work for you, comment and I’ll be happy to assist you. If it did work, then congrats! but don't forget to comment i'll be more happy and feel more motivated.....What we just did is fooled the OS into believing that it’s in the time period when the certificate is perfectly valid and hence, there arises no problem in installing it.

Next, if you don’t want to miss important appointments, adjust the date back to real one. :mrgreen:

Read More
// // Leave a Comment

How To Solved Certificate Expired Error In Your Devices

Hello Friends!

As you know that all nokia phones have Nokia Online CAcertificate the validity of this certificate which was provided by Nokia company itself for signing apps & can't be deleted, was expired on 2nd January 2016.After expiration of this certificate nokia s40 users are facing certificate expired problem & because most of the apps are signed with Nokia Online CA certificate. So here i am providing the solution of this problem.

Solution:-

Solution of this problem is quite simple.

Just change date of your device from settings(Settings > Date & Time).

Change it from current date to any date below 2015 (change it to 2014,2013,2012,2011....)

Now download / install the app you want to install.

After sucessfull installation change date to current date.

Try it now!

~Keep Visiting Minetechworld.heck.in

Read More

26 March 2016

// // 2 comments

[HOT] Best and easiest method to root Nokia X

Hello Everyone. Today I wanted to create a full and final Tutorial on how to root Nokia X. Whether you are on v 11.1.1 or have updated tov 1.1.2.2.

Step-by-step guide:

1.Download and install Nokia X Usb Drivers (if you haven't).

2.Download Nokia X ToolKit from here.

3.Set your device to USB Debugging and connect it to your PC.

4.Run the Nokia X Toolkit. You will see this screen:

nokia-x-toolkit1.png

5.Choose Option 21.

6.Let it work and after a while you'll find your phone booted into CWM.

7.There goto Mounts And Storage --> Mount System.

8.Then choose Flash Zip from SD Card.

9.There you'll find a zip of Superuser. Flash it.

10.After flashing, you should choose Reboot.

11.It will give you a prompt about fixing CWM. Just select NO.

12.Done. You will be rooted now.

I hope this works. Tested by me. So Enjoy.

Credits to Ethan(Developer) for this magnificent Toolkit.

P.S: Much better than KingRoot and other methods, I believe.

As i have mentioned earlier that i have tested this method personally and it works perfectly for me and it should work for you also still i do not take any guarantee and i will not be responsible for any issues caused.

Plese comment below if you have any queries...

Read More

21 March 2016

// // Leave a Comment

How to stop someone else internet connection?

Today i am going to tell you that how can you stop someöne else's internet connection by just creating a simple notepad virus.So lets start...

223744xjst6znwwe99j9mt.jpg

1) Open Notepad In Your Pc And Copy/Paste Or Type The Following Code:

@EchoOff ipconfig/release

2. Now Save This As StopNet.bat(Name Can Be Anything But .bat Is Must)

3. Now Send This File To The Target. When The Target Open It His/Her Internet Will Stop.

Done!:mrgreen:

Comment below....

Read More

19 March 2016

// // 1 comment

[Special][Hot] How to resume downloading all 'failed to download' files in UC Browser

Is Your Downloading Failed/error/Link Expired At The Final Moment?? And Not Able To Resume It?? Don't Worry, I Have Solution.

Earlier i have published post on how to resume failed to download files on opera mini.Many users asked me to post any trick for uc browser.So this time i am with a trick for uc browser....

How To Resume Download:

Step 1: First Goto File Manager > UC Downloads > (This is the folder where i download my files you should go to the folder where you download your files) Then Find Your Downloading File And .tmp File Just Below Your Downloading File.

Eg: Im Downloading XYZ.apk/.jar And It Fails At 53%. So Now I Need To Goto File Manager > UC Downloads > And I Have To Find File Named XYZ.apk And XYZ.apk.tmp Files.

Step 2: Now We Have To Move Those Files From UC Downloads Folder To Any Other Folder.

Step 3: Then Again We Need To Open UC Browser App And We Have To Delete XYZ.apk File From Downloading Files.

Step 4: Now We Have To Download Same File Again From The Same Link For A Minimum Of 2-5% And Pause It.

Step 5: Then Again Goto File Manager > UC Downloads > Now Delete Those Two Files [Downloading File & .Tmp File]

Step 6: Now Goto Folder Where You Moved First Two Downloading Files And Move Them Back To UC Downloads Folder.

Step 7: Now Open UC Browser App Again And Goto Download Manager And Resume Your Download.

Note: Does not work with "Resume Not Supported" files.

Enjoy !! :mrgreen:

Read More

16 March 2016

// // Leave a Comment

Paytm Unlimited Recharge Trick-Get Unlimited Free Recharge From Paytm By Paying Rs 50

Hello Guys. I know everyone wants to earn unlimited free recharge so Today we are giving you a new trick through which you can earn unlimited free recharge from paytm by paying Rs 50 only.

This is an loot offer. Everyone can use this trick.

IMG_20150607_193319.jpg

To earn unlimited recharge follow the steps below :-

How To Earn Unlimited Recharge From Paytm :-

1) Download Paytm App From Here

2) Open the app

3) Create new account

4) Initiate recharge of Rs 50

5) Proceed and apply promo code :NEW50

6) Pay the amount and complete your transaction.

You will get Rs 50 cashback in your paytm wallet within few minutes.

Trick Starts From Here :-

1) Now unistall paytm appp

2) Install Paytm App From Here Again.

3) Open the app and create new account

4) Initiate recharge of Rs 50

5) Proceed and apply promo code :NEW50

6) You will a message that - "Your Coupon is applied successfully and cashback of Rs 50 will be created in your account within 24 hours"

7) Now minimise your paytm app and download Paytm Wallet App From Here

8) Open your old account in which you have Rs 50 paytm cash

9) Send Rs 50 to your newly created account

10) Now you successfully received Rs 50 paytm cash in new account.

11) Open the minimised paytm app

12) Click on Proceed

13) Pay the amount using paytm cash you received.

14) That's it. You will get Rs 50 cashback in your paytm wallet within few hours.

Repeat the steps again to earm unlimited recharge from paytm app.

Hurry !!

Tags :- Paytm tricks, earn unlimited recharge, free recharge, recharge tricks, free recharge tricks, paytm loot, unlimited recharge tricks.

Read More

13 March 2016

// // Leave a Comment

How to start earning money from your mywapblog blog

Introduction

We discussed lot about earning money from the internet , Almost every topic is related to earn money from blogger blog . But today we are discussing about earning money from Mywapblog network . Mywapblog is one of the greatest mobile blog network without having any competitors , Wapsite builders like Wapka and Xtgem also have blogging tool's but wapmasters who are aiming to create blog will choose Mywapblog .

How to Earn Money From MyWapBlog

It is very easy to earn money from the internet especially from MyWapBlog , Because blog is the only one thing which get huge amount of traffic from Search Engine than the Downloading Wapsite . To earn money from your mywapblog , Just follow the steps that given below .

*.Log-in to YourDashboardonMyWapBlog. *.Click on the "Ads" Link under the "Appearance" Tab .

*.There you can see some of the "Ad-Network's" Click the first one "UCWEB Union" .

*.Sign-Up with " UC-Union" For Adding Your Site .

*.Log-in to "Uc-Union" Then Add Your MyWapBlog .

*.Add your wapsite to "UC-Union" Like the "Screenshot" Given below .

capture.png

*.It will take24 hoursto get theApprovestatues of your blog on UC-Union .

*.After gettingApprovefrom UC-Union , Click on the "Management" .

*.Copy the "ID" Which located near at your MyWapBlog "Title" .

*.Now come to the "Ads" Page on "MyWapBlog" Dashboard again .

*.Select "Ad-Network" As "UC-Web Ad-Code" .

*.Paste the "ID" Which you copied from "UC-Union" To the "Text-box" Which located under the "Publisher ID" Label .

*.Click on the "Save" Button .

*.You areDone.

You can also choose "Adsense" and the other Ad-Networks which located under the "Ad-Networks" Label , They also having the same steps like "UC-Union" Do . It is better you to select "UC-Union" or "Adsense" For earning money . Because their service is using millions of wapmaster's to earn money from their wapsite .

I hope you well enjoyed this article , If you have any doubts or suggestions related to this article , Please let me know by using the comment box given below . Thanks

Read More
// // Leave a Comment

"Run or Die" by Rendered Ideas - How to crack network connection ?

Rendered Ideasjust have released their latest game for j2me named Run or Die.

You can download it from OperaStore.

Now I'm gonna share you how to crack its network connection >>

145786907871052.png

Extract the game.

1. 1st go to y.class by Bytecode editor, open methods, you see a method there a()Ljava/lang/String;- open it > you see a link there like http://www.google-analysis.com/...- remove that http:// and save.

2. Then go to com/renderedideas/platform/VservManager.class. In this class search for http:// and remove them. You will find two links there. And save.

3. Next go to com/renderedideas/platform/c.class. Open the methods of this class file, you see a method there -run()V- open it and see at 45 no. string like -

ifneLabel50 ldc "Internet connection..."

Just replace ifne to ifeq and you see a link there http://www.example.com- remove the http:// and save.

Compress and enjoy.:mrgreen:

If you want yourself to stay away from all that headache then simply comment your screensize in the comment box i'll do it for you ....

This is just for educational purposes i'm not responsible for any consequences

Read More

03 March 2016

// // Leave a Comment

How To Convert Your Big Css Into A Short One

Hello Dear Friends.....

Today we're going to know how we can make long-long css into a short one of just 70-80 words.....

Here We Go.....

1.) First go to your Dashboard < Theme < Edit Css.

2.) Then copy your whole css after that paste it in notepad.

3.) Now save your css with some name (ending with .css).....For example - i've saved my css file in notepad with name " Minetechworld.css ".

4.) Now Again login to your Mywapblog account and go to Dashboard < Upload File and Upload Your Css File (for me its Minetechworld.css).

5.) Now copy the address of your uploaded file.

6.) Now go to you Dashboard < Themes < Edit Css And delete/remove your long css.

7.) Now Paste the url address you've copied in Step 5 into the below code and then paste that code at the place of your long css.

8.) Now save your theme.

CONGRATULATIONS NOW YOU HAVE CREATED A SHORT CSS FOR YOUR BLOG......

If you liked this article then please support me by sharing it on facebook.This Blog Is protected by DMCA so don't even think of copying my posts if you love your blog brcause DMCA can easily delete it if you violated its rights.

Read More

02 March 2016

// // Leave a Comment

An amazing and working way to view the pc-view of any website on the internet

Hello Friends ! I've Not posted any tricks from somedays because of my journey...anyways now i am back here with an amazing trick to view the pc mode of any website through your mobile....

The trick starts here :

Things You'll Need

1.) A facebook account.

2.) Some Friends In That account.

3.) Uc Browser (Available At Our Download Portal)

4.) An Internet Connection (which i guess you have already :p ).

Working Steps

1.) Login to your facebook account.

2.) After the login select any of your friend and go hit the message button and message him the name of site which you want to see in pc-view.

NOTE: when you are messaging the site name dont forget to add " http:// " before the site or page name. For e.g : http://mywapblog.com is CORRECT but only mywapblog.com is NOT-CIRRECT.

3.) Okay Now Click On the Name Of the Site you've send to your friend.....

4.) Congratulations now you are in the pc view of the site you want.....

HERE ARE SCREENSHOT OF MYWAPBLOG PC-VIEW WHICH I ACCESSED VIA MY ASHA 311 WITH UC BROWSER : uc-browserscreenshot-1799.png

If you liked this article then please comment and share it (instead of copying it) your comments motivate me to post more for you

Read More

19 February 2016

// // Leave a Comment

Steps On How to Create Facebook Gateway On 2go

Many People have been having difficulties with their Facebook gateway which can enable them Chat on 2go with their facebook friends while some do not even know they can Connect to Facebook Chat with 2go via FACEBOOK GATEWAY:

Facebook gateway enables you to chat with ur online facebook friends and this makes 2go really Interesting.

Now how to activate it:

Goto settings on your 2go >> Gateways >> Facebook gateway >> Activate...

It will then request for your Facebook username and password.

NOTE::Your facebook username is different from your real name on facebook..

For example: My FB real name is "Jalaj Gupta" but my facebook username is"jalaj.gupta.5015".

To create or know your facebook username: Login to facebook, then click on Profile >> Info, you will see profile name as "facebook.com/jalaj.gupta.5015" [It is only jalaj.gupta.5015 that is the username].

You can create if it has not yet been created. Now back to 2go, go to Settings >> Gateway (facebook gateway), enter your username and password all in SMALL LETTERS then click activate and that's all, you will now begin to chat with your facebook friends online!

But where the problem lies is even when some people enter their username and password correctly it will still be writing "incorrect facebook detaiils".

Now you try again and make sure you are carefull and if it continues writing the same thing, then... The simple SCOPE is to just Change your facebook password and try again.

[Make sure your new password is made up of small letters and the password MUST be alphabets of seven letters]

..THAT'S ALL..

Read More

12 February 2016

// // Leave a Comment

Opera Modding Tutorial (Part 1)

opera-web-pass-1.jpg

*** Exclusive * Full Moding Tutorial / Mod Opera Mini Browser with S40 Phones...

So today we're going to know how to mod a opera browser without pc with the help of your s40 phone and some amazing apps.

So friends do you know what is modding?What are modded apps?

To mod is a simple way of saying modifying and costomizing an app or game to one's likeness (the modder).

APPLICATIONS NEEDED(all apps are available at our download portal)

1. BLUEFTP

2. HEXEDITOR

3. CALC4M

4. OPERAMINI.ZIP

5. CLASSEDITOR

6. Classtranslator

The First Step

Open your Blueftp and locate the opera in zip format (.zip),press open and press your upper-left key and choose select and then mark all. press menu and select extract selected items and locate a folder where you want to keep it.press yes untill you pest all.If you have done this, now lets go.......

CHANGING OPERA'S NAME

Open your classeditor, locate the extracted files, open META-INF, inside it, you will see midlet-mane, change it to any name you want....

THATS ALL READ THE NEXT PART TO KNOW MORE

1.) CHANGING OPERA'S NAME

2.) CHANGING ICON PICTURE

3.) CHANGING "CONNECTING,LOADING,PROCESSING,INSTALLING"

4.) CHANGING LOADING BAR

5.) CHANGING WELCOME PAGE

6.) CHANGING USER AGENT

7.) MODDING SPLASH SCREEN

THE LAST STEP

PACKING YOUR APP

Open your Blueftp, locate the folder where the extracted files are kept.

Open it then press menu and choose select all, it will highlight, press menu again chooseb compress to zip rename to anyname _jar ok and continue to press yes untill you finish compressing it.Now quit Blueftp, Go to phone gallery and rename it to .jar

This post is only for educational purpose .I will not be responsible for any misuse Done.

Read More